First Time at the RV Dump Station? Here’s Exactly What to Do (Step by Step)
Nobody posts about this part of RV life. But everybody has to do it — and your first time doesn’t have to be a disaster.
Let’s get this out of the way: the dump station is the one RV topic nobody wants to talk about. But if you own a travel trailer and you use the bathroom in it, this is a skill you need, and it’s way less intimidating than it sounds.
We’ve been weekend camping as a family for years, and we can tell you honestly: once you have a system, this takes about 10 minutes. That’s it. Ten minutes and you’re done, hands clean, hose stowed, rolling out.
Here’s the step-by-step guide we wish someone had handed us before our first time.
Before You Leave the Campsite
A little prep at your site saves a lot of stress at the dump station.
Close your gray water valve the night before you plan to dump. Let your gray tank fill up — you’ll need it later (we’ll explain why in a minute).
Gather your supplies. You need disposable gloves, your sewer hose, a hose rinse adapter if your campground has one, and sanitizing wipes. If you keep everything in one dedicated bag, you just grab it and go. No hunting through the basement storage for gloves while people wait behind you.
Check your tank levels on your monitor panel. You want to dump when your black tank is at least two-thirds full. A fuller tank flushes better, trust on this one.
At the Dump Station: The Step-by-Step
This is the actual procedure. Follow it in order every time, and it becomes muscle memory fast.
Step 1: Pull up and position your trailer
Line up your sewer outlet (the one on the driver’s side of most trailers) as close to the dump station inlet as possible. The shorter the hose run, the better everything flows.
Step 2: Gloves on first
Before you touch a single valve or fitting, gloves go on. This is non-negotiable. Heavy-duty nitrile gloves work great — they’re chemical-resistant and you can actually grip things in them.
Step 3: Connect your sewer hose
Attach one end to your trailer’s sewer outlet (it twists and locks on) and place the other end securely into the dump station inlet. Make sure it’s seated well. A hose that pops loose mid-dump is… an experience you don’t want.
Step 4: Open the black tank valve first
This is the important one. Black tank always goes first. Pull the black tank valve handle (it’s usually the one closest to the outlet or marked with a label). Let it drain completely — you’ll hear the flow slow down and eventually stop.
Step 5: Open the gray tank valve second
Here’s why you saved your gray water: it’s soapy dish and shower water, and it rinses the sewer hose on its way through. Think of it as a free flush for your hose. Open the gray valve and let it run until it’s done.
Step 6: Close both valves
Close the gray valve first, then the black valve. Snug them shut — you don’t need to force them, but make sure they’re fully closed.
Step 7: Rinse if a rinse connection is available
Many dump stations have a dedicated rinse hose (it’s usually a separate spigot near the inlet — never use the fresh water hose). If there’s a built-in tank rinse hookup, use it. Run water into your black tank for a couple of minutes, then open the black valve again to flush. This keeps your sensors accurate and your tank from getting funky between trips.
Step 8: Disconnect and stow
Lift the dump-station end of your hose slightly to drain any remaining water toward the inlet. Disconnect from your trailer, let the hose drain fully, and stow it. Some people rinse the outside of the hose too — your call.
Step 9: Sanitize your hands
Gloves come off, then immediately sanitize. Wipe down anything you touched — the valve handles, the sewer cap, the storage door latch. This is the step people skip when they’re in a hurry, and it’s the one that matters most for your family’s health.
Step 10: Add tank treatment
Before you leave the dump station (or when you get home), add a dose of holding tank treatment to your black tank with a little water. This keeps odors down and helps break things down before your next trip.

The Stuff Nobody Tells You
It doesn’t smell as bad as you think. Seriously. If your tank treatment is doing its job and you’re dumping when the tank is reasonably full, it’s quick and contained. The anxiety is worse than the reality.
Don’t open the black tank early. Some new RV owners leave the black tank valve open when they’re hooked up to a sewer connection at the campsite. Don’t. Liquids drain out but solids stay behind and dry out. This creates a situation that is significantly worse than just dumping normally. Keep it closed, let the tank fill, dump when it’s time.
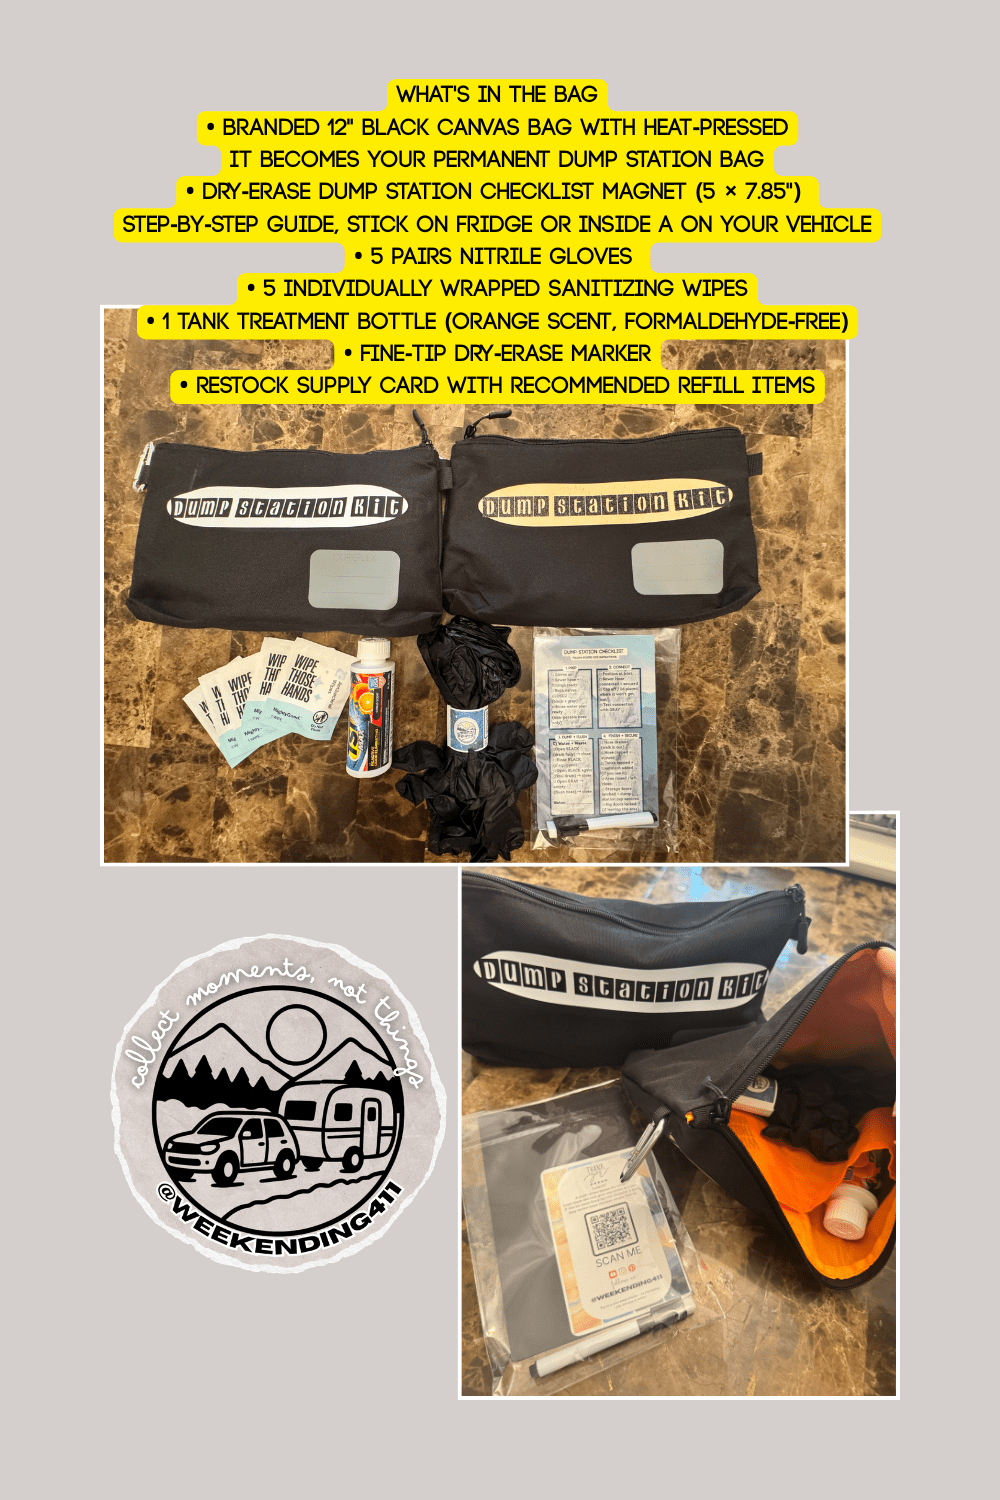
Have a dedicated dump bag. Gloves, wipes, treatment, marker. It’s everything in one bag that lives in the same spot every trip. When dump day comes, you grab one thing and you’re ready. No scrambling, no forgetting. We have one if you want to buy it! Click on the link.
Be courteous at the dump station. Have your hose and supplies ready before you pull up. People are waiting. Get in, follow your system, get out. It’s not the place to figure things out for the first time.Kids are curious about it. And honestly? Teaching them the system (at an age-appropriate level) is a great way to show them that taking care of your rig is part of the camping experience. It’s not gross and it’s responsible.

Why a Checklist Changes Everything
Here’s the real secret: the difference between a calm, clean dump station visit and a chaotic one is simply having a system you follow every time.
When you’re standing at the dump station for the first time — maybe with someone waiting behind you — the last thing you want is to try to remember the order from a YouTube video you watched three weeks ago. Was it black first or gray first? Did I close the valve before disconnecting? Where did I put the gloves?
A physical checklist you can see, follow, and check off removes all of that. Stick it on your fridge, stick it inside a cabinet door, stick it on the wall of your utility bay — wherever you’ll see it on dump day. Follow the steps in order. Wipe it clean. Done.
It sounds simple because it is. The system is the whole thing.
You’ve Got This!
The dump station is one of those RV things that feels like a big deal exactly once — the first time. After that, it’s just part of the routine, like hooking up water or leveling the trailer.
Get yourself a system. Follow it every time. Keep everything in one place. And don’t let the dump station be the reason you hesitate to book your next weekend trip.
You still have a job on Monday. Make the weekend count.
Weekending411 makes organization systems for weekend camping families — including a complete Dump Station Kit with a dry-erase checklist magnet, branded canvas bag, and starter supplies. Everything in one bag so dump day is a 10-minute routine, not a 30-minute guessing game. Shop the Dump Station Kit →
Tags: RV dump station for beginners, how to use RV dump station, first time dump station, RV dump station step by step, travel trailer dump station guide, RV sewer hookup for beginners, dump station checklist, new RV owner tips, RV dump station procedure, weekend camping tips


Leave a comment